
The grandeur of Hogwarts Legacy Puzzle Doors isn’t just about soaring staircases and bustling classrooms. Hidden behind ornately carved frames lie secret chambers, whispering promises of forgotten lore and enticing loot. But unlike their mundane counterparts, these enigmatic portals require more than just a well-placed “Alohomora.” Fear not, witches and wizards! This guide equips you with the knowledge to decipher these cryptic puzzle doors and claim the treasures within.
Cracking the Code: Unveiling the Puzzle Door Secrets
These puzzles demand a keen eye and logical deduction, a refreshing change from fumbling with lockpicks. Here’s what you need to know:
Beyond “Alohomora”:
Your trusty unlocking charm won’t work here. These puzzles require a different approach, one that utilizes wit and observation.
The Language of Symbols:
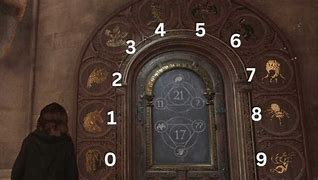
Take a close look at the intricate carvings adorning the door’s frame. You’ll find fantastical creatures and symbols etched around the archway. Each symbol corresponds to a specific number (0-9), arranged in a clockwise fashion, starting from the bottom left and continuing to the bottom right. Essentially, it’s a magical code waiting to be cracked.
Mind the Math:
The door will likely display one or two mathematical equations involving these numbered symbols. Your task is to decipher the code by correctly identifying the missing value(s). Think of it as a magical riddle, waiting to be solved.
Turning the Dials:
Look for rotary mechanisms on the doorframe. These dials represent the variable symbols in the equations. Rotate them to match the corresponding number you identified based on the creature carvings.
A Eureka Moment:
Once you’ve set all the dials to the correct numbers, a satisfying click will echo, and the door will swing open, revealing the hidden chamber and its rewards.
Where the Magical Doors Hide
The magical world of Hogwarts is riddled with these puzzle doors, waiting to be discovered by curious students. Here’s a glimpse into some well-known locations to keep your eyes peeled:
Central Hall Rafters:
Take a daring leap of faith and climb the rafters in the Central Hall. You’ll find a level 1 puzzle door leading to a hidden chamber.
Arithmancy Classroom:
As the name suggests, the Arithmancy Classroom is practically brimming with these puzzles. Expect to test your numerical prowess here.
Long Gallery:
Don’t miss the opportunity to test your wits on the puzzle door nestled within the Long Gallery.
Hidden Corners:
Keep your eyes peeled throughout the castle. Puzzle doors can be found in unexpected locations, so be on the lookout during your explorations. Remember, these are just a few examples. Part of the magic lies in the thrill of discovery !
Common Challenges Faced by Young Witches and Wizards (and How to Overcome Them)
While the basic concept remains the same, some variations in these puzzles can throw you off track. Here’s how to tackle these challenges:
Multiple Equations:
Some doors present you with two separate equations. Solve them independently to decipher the correct values for each dial. Don’t get overwhelmed – take it one equation at a time.
Missing Symbols:
Occasionally, you might encounter a puzzle with a missing creature symbol, making it harder to assign numbers. In such cases, look for clues in the environment around the door or refer to notes or maps you might have collected during your exploration. Leave no stone unturned!
Double-Checking:
Math errors happen, even to the brightest witches and wizards! After setting the dials, double-check your calculations and the symbols on the door to ensure you haven’t made a mistake. A quick review can save you time and frustration.
Beyond the Basics: Advanced Puzzle Door Techniques
As you progress through the game, you might encounter some more intricate puzzle door variations. Here’s a heads-up:
Matching Symbols:
In some instances, the carvings might not directly represent numbers. Instead, they might depict specific objects or creatures that have a numerical equivalent assigned to them elsewhere within the environment. Keep an eye out for additional clues or inscriptions. Think outside the box!
Trial and Error:
For particularly complex puzzles, a little trial and error might be necessary. If you’re truly stuck, try systematically rotating the dials to see what combinations open the door. Persistence is key!
What are Hogwarts Legacy Puzzle Doors?
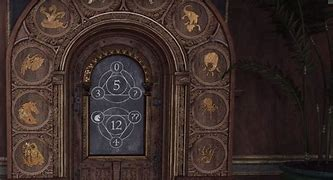
These are special doors adorned with ten creature symbols and a chalkboard displaying two triangular number puzzles. Solving the numerical puzzles using the creature symbols as a key is the secret to unlocking them.
How Do I Solve the Puzzles?
Identify the Creature Key:
Each creature symbol around the door corresponds to a specific number (0-9). Here’s the key:
Demiguise – 0
Unicorn – 1
Graphorn – 2
Hydra – 3
Fwooper – 4
Crab – 5
Lizard – 6
Octopus – 7
Spider – 8
Multi-headed Snake – 9
Decipher the Number Puzzles:
Look at the chalkboard. You’ll see two triangular number puzzles that resemble equations. Each number within the triangle represents a creature symbol.
Solve the Equations:
Use the creature key to convert the symbols on the triangle into numbers. Then, solve the equations like any basic math problem (usually requiring addition) to find the missing number.
Unlock the Door:
Locate the two stone mechanisms (one marked ‘?’ and the other ‘??’) on the walls flanking the door. Interact with them and set the missing number you obtained from solving the equations. If you’ve done it right, the door will magically swing open
FAQs :
Where Can I Find Puzzle Doors?
These doors are hidden throughout Hogwarts, including the Grand Staircase Tower, Library Annex, South Wing, and various classrooms. Keep your eyes peeled as you explore the castle!
Are There Any Tips for Solving the Puzzles Faster?
Write it Down:
Jot down the creature key and the number puzzles on a piece of paper for easier reference.
Start Simple:
Begin with puzzles where the missing number is clearly an addition problem (e.g., two large numbers on one side and a smaller number missing on the other).
To read more , click here